
Good news, people…I’ve discovered the most fun you can have with WordPress -and it’s with the Advanced Custom Fields plugin. Come on in and join the party!
Advanced Custom Fields…trust me
Ok, sorry guys. I got you in here under false pretenses. The Advanced Custom Fields (ACF) plugin is not fun. It’s useful – very, very useful…but not fun. There’s no fun to be had here. This is about work, damn you. WORK!
You’ll find this plugin to be priceless if you’re a web developer who routinely turns over WordPress sites to clients, or even if you’re a heavy WordPress user who might be looking for some shortcuts to increase productivity.
The plugin allows you to create your own custom fields and have them appear in the post/page editing screen along with all the other boxes like Featured Image, Excerpt and all that good stuff. You do have to be somewhat comfortable with editing your theme files in order to get this working, so be aware of that.
If you’re fine with that, you can set up text fields, image fields, checkboxes, radio buttons and the like. I know at first it may not seem like you need such a thing, but read on.
ACF: The Problem
I recently found myself developing a site where there would be many product pages with a standard layout, featuring information such as:
Product Title
Product Item Number
Product Weight
Image
Shipping Cost
Product Description
I was tasked to set up the initial products, then have the client take over from there to add their new items as they became available.
So by now, anyone who’s used WordPress can see the problem. When you go to make a new post or page, that editing window can be pretty intimidating. Is someone new to WordPress going to know how to put the image in, make it link to the larger one and also have it float over to the left? How will they handle adding multiple images? Will they add the information out of order or use inconsistent text styling?
Frankly, even an expert would have trouble making every page look the same by hand like that, or at least it would take too long to create your post that way.
ACF: The Solution
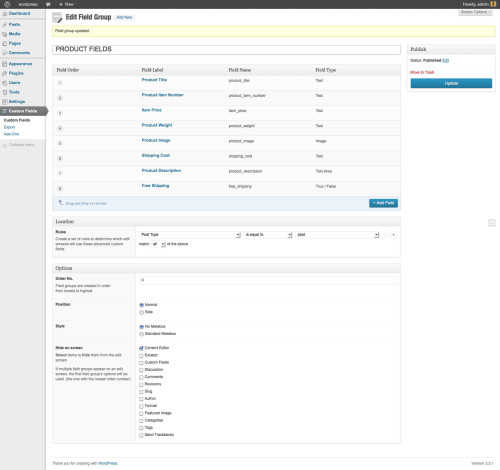
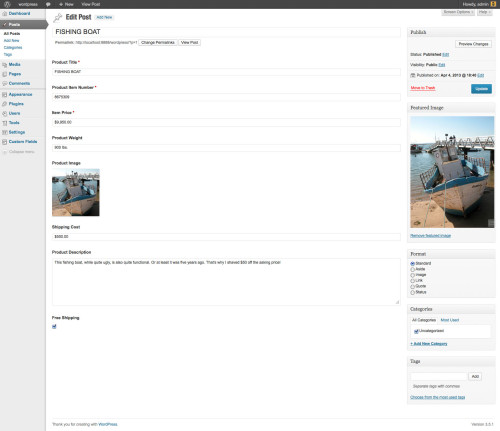
To get around this, I used ACF to create specific fields for each piece of information, and I added those fields to the editing window. This way all the client would have to do is tab through each specific field, add the info and never worry about the styling or positioning, because I would have taken care of all that by editing the theme file’s html and css code.
When users add an image, there’s literally nothing else they can do except add it. Since there are no more options, they don’t have to worry about it, it just shows up on the page at the size and position it’s supposed to.
Making things even easier, ACF allows you to switch off the editing boxes that you don’t want to show in the editing screen. This makes it much less confusing for your client, and for you.
For example, I used ACF to turn off the main “Content Editor”, which if you’re familiar with WordPress is the box you’re used to typing your posts and page info into. So when the client gets into the editing screen, that big, empty, intimidating window is completely gone and they don’t have to wonder if they’re supposed to be doing something with it or not.
So how does this work exactly???
There are many, many tutorials and plenty of documentation on how this works (I know, I read most of them when I was learning the program), so I won’t go into excruciating detail here, but I’ll break down the process. There are two parts to it – creating the fields and getting them to display:
PART ONE:
- Install Advanced Custom Fields (obviously)
- Go to CUSTOM FIELDS>Custom Fields and click the “Add New” button at the top to add a new “Field Group”
- Now that you’re inside the Field Group click the “Add Field” button
- choose the type of field and set it’s options
- keep adding as many fields as you need until they’re all finished
- In the “Location” box, set the fields to display on your Posts or Pages (or whatever other Custom Post Types you have)
- In the “Options” box at the bottom, set the position of the fields and turn off any items you don’t want showing.
- Click the “Publish” button to save the Field Group
For my client’s site, they needed the fields for posts, but not for pages. So as you can see in the first screenshot above, the field group is only set to show up on posts. When they edit a page, they’ll see the main content editor as normal.
At this point you can go to your post editing window and the fields will be showing. You can enter the info and save your posts as normal. However, your fields will NOT be showing on your site yet. You’ll need to add code to your theme files to get them to appear. This is the part that can be a little intimidating if you’re not used to editing your theme files.
PART TWO:
Ideally, you’ll be working with a child theme. If that’s not possible then at least try to copy the theme file first before you edit so you can have a backup.
If you’re working with posts you’ll likely be looking for the “single.php” file in you wp-content/themes/YOUR_THEME/ folder, or the “page.php” file in the same folder if you’re using a page.
In my case the site was using a child theme based on the default Twenty-Twelve theme, so the file I needed was actually “content.php”.
It can get a little iffy once you’re inside the file depending on the theme you’re using. You need to determine exactly where you need the field to appear on the page. When you find that spot you throw in this code:
<?php the_field('product_title'); ?>
Where “product_title” is the actual name of one of my fields. If you check the first screenshot above, you’ll see a “Field Label” and a “Field Name“. “Field Name” is the one that ACF is actually looking for here (the “Field Label” is the human readable name for your benefit).
So wherever I drop that piece of code, the Product Title is going to display there. You’ll go through your theme file and drop that code, making sure to change the Field Name to the ones you want.
It can seem scary to people because they see the php code and freak out, but you’re not really working with php, only changing the name of the required field, so it’s not bad at all.
ACF IMAGES
Undoubtedly, showing images is going to be a big part of what you need ACF for. They can be easy, but if you’re looking to link the image to a larger one, or show multiple sizes of the same image then you’ll need to add a bit more complexity to the whole deal.
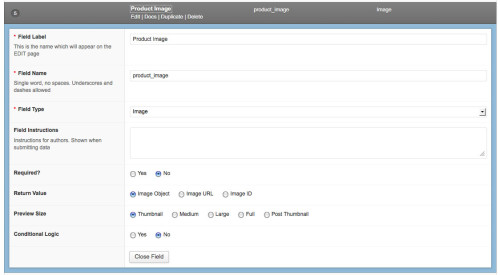
Checking my screenshot, I’ve set up my image field to return an “Image Object”.
If I chose “Image URL”, the field would just dump the plain url of the image right into the code. This is fine, but you’ll have to make sure you choose the correct size when you add the image in the editing field. Not a problem if you remember this all the time, but your client may not.
Choosing “Image ID” will return the “attachment” ID of the image. It gives you more information to play around with, such as the width and height of the picture.
My choice, the “Image Object” returns an array of all the info about the image, including all of the sizes that WordPress generates at upload time. This is especially handy if you need to link to the larger image, since all the sizes are available right in the field itself.
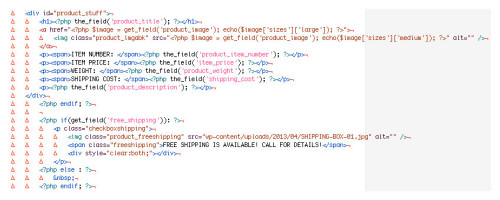
<a href="<?php $image = get_field('product_image'); echo($image['sizes']['large']); ?>">

<img class="product_img" alt="" src="<?php $image = get_field('product_image'); echo($image['sizes']['medium']); ?>" />

</a>
In the above code, I’ve used a slightly different tag than the rest, this is the “get_field” tag, and it’s used when you’re “grabbing” the info for a field, doing something with it, and then displaying it. The other code “the_field” simply dumps the field right into the page.
To pick apart that code, the link in the first part:
$image = get_field('product_image')
tells WordPress to grab the info assigned to that field. This is the array of info that goes along with this image, namely its sizes, ID, alt tag, description, url and more.
The second part of the above code:
echo($image['sizes']['large']);
just tells WordPress to pick two attributes from the array and show them. In this case the “size” -specifically, the “large” size within the “sizes” section of the array.
So the link in this example would go to the large sized image that WordPress generated at upload time. You can see the actual IMG tag itself has a similar tag, but this one is only looking for the “medium” image size so it can display it on the page.
Using this code, when the client would upload an image to that field, the actual page showed the medium size and was automatically linked to its large size, and they never have to worry about doing any of that themselves, it’s all done for them.
Final Note: The preview image sizes available in the ACF field screen pertain only to the preview you’ll see in the post/page editing window, not what you’ll see on the final page.
Only show this field if…
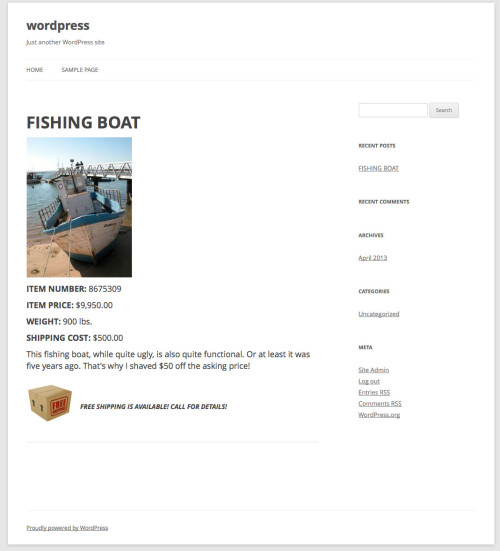
Oh yeah, there was one more thing the client needed for the products: A “Free Shipping” option.
I created the field as a “True/False” checkbox in ACF. This way, if that particular product had free shipping available, all they had to do was check the box, and a free shipping icon and message would appear on that product.
It was easy to have the image appear by placing the field in as shown above, but doing it that way meant that it didn’t really respond to the checkbox state -it showed on every page no matter if it was checked or not. It turns out a bit of extra coding was necessary to make this happen:
<!--?php if(get_field('free_shipping')): ?-->

<p class="checkboxshipping"><img class="product_freeshipping" alt="" src="wp-content/uploads/2013/04/SHIPPING-BOX-01.jpg" />

<span class="freeshipping">FREE SHIPPING IS AVAILABLE! CALL FOR DETAILS!</span></p>
<div></div>

<!--?php else : ?-->


<!--?php endif; ?-->
To break it down, using the “if” statement:
<!--?php if(get_field('free_shipping')): ?-->
Tells WordPress to only show that field if it’s active, and if it is active, it goes on to display the paragraph and image code I’ve placed there.
If it’s NOT active, meaning the box ISN’T checked, it moves on to the “or else” part:
<!--?php else : ?-->
and proceeds to display the code that follows, which in this case is merely a non-breaking space character, or essentially nothing.
Using this method, it’s very easy for anyone to turn the shipping icon on or off depending on what promotions they happen to be running at the time.
Some ACF “Gotchas” to watch out for
As great as this plugin is, there are a couple of things to be aware of before you start down this path.
1. Some plugins don’t work with ACF.
This happened to me twice. You might install a plugin that can display info from WordPress “Custom Fields”, but that doesn’t necessarily mean it can use “Advanced Custom Fields”. If this happens and it’s a plugin that you truly need, you’ll have to be a bit handy with php to make sure it’s “aware” of the ACF fields so it can grab from them. I tried one plugin and wrangled with it for three days before I gave up and ended up using something else. I just couldn’t figure out how to bridge the two plugins.
Once you use ACF, be prepared to constantly check that each new plugin you use for displaying custom fields can work with it.
2. Beware of Featured Images.
I’ll tell you straight up: ALWAYS USE A FEATURED IMAGE.
Yup. No matter what. Even if you have a different image field already set up and your theme doesn’t display featured images. There will come a time when you’ll need each post to have an image, and if you don’t do it as you go along, you’ll end up having to go back through hundreds of posts in order to assign them.
Towards the end of the project, the client asked me to use a related posts plugin. For the thumbnail image it was supposed to choose the featured image of each post. As it turned out I never assigned any featured images, because I thought it wasn’t necessary. Well, it was necessary, and it could have been so simple. Instead, I had to use yet another plugin to help me turn attached images into featured images. It was a huge mess, and really aggravated my carpal tunnel sydrome. Aaargh…
After that, I made sure the client knew to set a featured image whenever he made a new post. A few extra clicks to be sure, but it saved a lot of headaches later.
Many, many plugins and services look for that featured image by default, and you never know which one of them you’re going to need in the future, so just go ahead and be proactive on it so you can spare your wrists.
3. Beware of changing themes.
As shown above, the code needed to display your fields is placed into your theme files. If you move to a new theme, all those fields won’t display until you add the code to the files of the new theme.
If you have a site that routinely changes themes then you’ll need to be wary of using this plugin, unless it’s few enough fields that it’s not a hassle to replace them all. And as stated before make sure to use a child theme, so updates don’t overwrite the changes you make.
4. ACF info is stored in two locations in the database. This isn’t really a “gotcha” but I just thought I’d add this in case anyone needs it.
The ACF Field Group is actually a “Post Type” itself, so it’s stored in the “wp_posts” table, while the fields inside the post group are saved into the “wp_postmeta” table. There came a time when I needed to grab a field key out of one of those fields and I had to hunt down this info. Hopefully this will spare someone else from rummaging fearfully through their own database in search of the ACF stuff.
THE WRAP UP
Before I go, I just want to do a quick link dump here in case you’re looking for more information. These are the pages I looked over when I needed to get up to speed on ACF.
- Using Advanced Custom Fields for WordPress
- Adding Custom Fields to a Custom Post Type, the Right Way
- Custom post fields using Advanced Custom Fields WordPress plugin
- Displaying field data in your theme
- Getting Started: ACF Code Examples
- ACF Image Field Type
- Video Tutorial Channel of ACF Creator, Elliot Condon
So that’s a wrap on this one. Hopefully you found something you can use here. The ACF plugin really helped me out during my project, and I’ve continued to use it in all my new WordPress jobs. Yes, it can seem intimidating at first glance but you’ll find it’s pretty straightforward once you get into it.
If you have any questions, let me know in the comments and I’ll see if I can help out. See you guys next time!


Hi John,
Such a nice tutorial to Use Advanced Custom Fields. Really love it and will try for sure.
Thanks
Thanks Vipin, I hope you can get a lot of use out of the plugin, it really works well!
I was searching for a simple tutorial about ACS and I must say that this one is really exhaustive! I had to write down a couple of steps, but for sure this is gonna speed up my work!
Thanks!
Hi Simone, thanks for reading and I hope this helps you out!
I get woocommerce plugin, and this work fine, but dony have best price.
Yeah, as I recall, Woocommerce is free but the add-ons for it cost a bit. ACF is free, but it might take a little elbow grease to replicate any WooCommerce functionality. Good luck if you give it a go!
As a newbie blogger i find that WordPress is the most recommended blogging platform with very useful plugins to help webmasters quickly setup their sites. Though these apps usually require time investment to set up effectively for seo they are indeed useful, this one included.
Great Tutorial thanks, this was exactly what I was looking for.