I’ve had this site running on WordPress now for a little over a year, and I’ve wasted a lot of time by not optimizing it. For this reason, I decided to enable my related posts plugin to try to encourage some more reading of the articles on the site.
To that end, I finally got around to enabling the WordPress Related Posts Plugin (make sure to check the comments on this page for more tips). This plugin simply adds some links to the bottom of each post based on the tags you input when you created the post.
Should be short and sweet, right? Well…
As usual, something went wrong. Namely that I didn’t have the foresight to fill out the tags section of each post as I created them. Gaah! I’d been solely relying on Categories to organize the site. Not using WP to its fullest potential at all.
So there were no related posts showing up at the bottom of any articles. In fact, the default text was showing that literally said “No Related Posts”. Not a good sign on your site, really.
I knew at this point that I was going to have to manually go in and add those tags. I hunkered down, opened up the articles in tabs and went through them as fast as possible. I have less than 100 articles on here at this point so it took about 45 minutes to add tags to each one, especially once I started using the WordPress “most used tags” feature to choose from a tag cloud.
So I got the plugin working, and now the related posts were showing up at the end of each article. Good. Except I noticed in the plugin admin page that you could also choose to show thumbnails in addition to (or instead of) the text link. I thought that would make it more interesting, so I turned on the feature.
When you do this, it asks you to supply the custom field where your thumbnail resides. If you’re not using a lot of images, this feature may not be a big deal. As of this writing, I’m using the Magazeen theme from Smashing Magazine, and it features the thumbnail gallery at the top.
Each post needs to have at least 1 image for the thumbnail, so that part wasn’t the problem. What ended up being a problem is that the thumbnail is dynamically generated and it’s not stored in a custom field. The large image that is used to generate the thumbnail is stored in a custom field.
When I set the Related Posts plugin to use that field, it didn’t resize the image on the fly to make a thumbnail (the plugin doesn’t claim that it does this anyway) and the whole large size image was displayed, seriously messing up the layout, as you might imagine.
At this point, I knew I needed to add another custom field and put in the url of the thumbnails (already generated by the Magazeen theme) so they could show up in the related posts.
So now I had to go through the posts again to add in the custom field with the thumbnail url at the end. Luckily this wasn’t quite as bad as it sounds since I was able to take the image url from the custom field created by the Magazeen theme and paste it into my new thumbnail custom field.
After I pasted the image in, I had to append a tiny bit of code to the end of the string. This bit was generated by the “timthumbs” script that resized the images to thumbnail size. With that done the new custom field would call for the thumbnail instead of the large main image.
Or so I thought…
Turns out I screwed up the url again, as the timthumbs script actually prepended some info to the front of the url as well. Crap. That meant all the urls I spent another 45 minutes pasting in were all wrong. Obviously I should’ve tested one before I went through and did all of them. Curses.
I didn’t have it in me to go through all the articles again, so I thought “can’t I fix this directly in the database?”
I’ve had some experience wrangling with the MySQL database in Joomla websites, so I didn’t really have a problem doing it. In fact I wished I’d thought of it earlier.
So all I had to do was find the table that held the custom fields, then prepend all the urls with the correct info, and done.
Needless to say, my entire day became all about fixing the database errors I caused.
Luckily I had the foresight to do a complete backup of my site before I went monkeying around in the database. I also have my database emailed to me every couple of days. Even so it got a little hairy there.
I logged into my hosting cPanel and went to the phpMyAdmin. Once in there I browsed to my WordPress Database and started hunting and pecking around the table to see where I could find those custom fields. Eventually I had to Google it but I finally found the correct table -the wp_postmeta table.
I chose to view all the rows on one page and then sorted by “meta_key” and I saw all my custom fields lined up nice and easy.
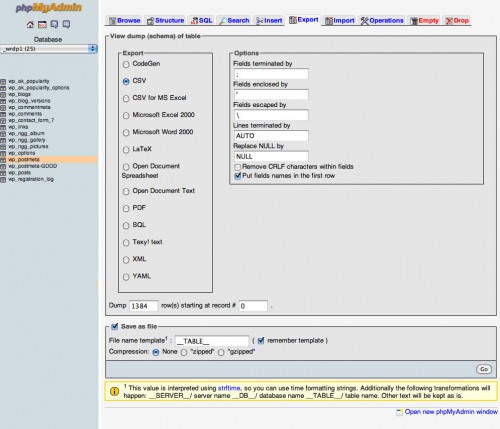
So now it was time to actually edit all the fields. To do this, I clicked the “Export” tab while in the wp_postmeta table.
Once in the Export tab, I chose “CSV” for my format, then left everything else the same EXCEPT -I changed the “Fields enclosed by” character from double quotes (“), to a single quote (‘). That always seems to work out better for me.
I also checked the “Put fields names in the first row” box because I just like to immediately know what field is what. You can always delete it later if you want.
Finally, scrolling down to the bottom, “Save as file” is checked on by default (at least in my install -check this if it’s not on already). Then I clicked the “Go” button on the bottom right.

A .csv file named the same as the table was created and downloaded to my default download directory. I opened up this file in NeoOffice on the Mac, but obviously Microsoft Excel or OpenOffice will work as well.
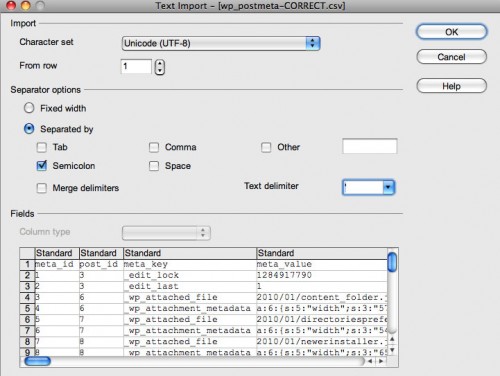
When you open up a .csv file in NeoOffice you’ll be confronted with a “Text Import” dialogue box. You’ll have to make sure here that the delimiter characters you chose when exporting match up with the characters you choose here in this screen. You’ll see in the preview if the columns are looking correct or not.

Now that I had the file open, I needed to sort it so that all my custom fields were together for optimal editing.
To do this I clicked the top left-hand most square in the spreadsheet -the one directly above the number “1” on the left. This selected the entire spreadsheet. Then I DESELECTED the top row (header names) by command-clicking on the number “1” on the left (probably control-clicking on Windows will do this, too).

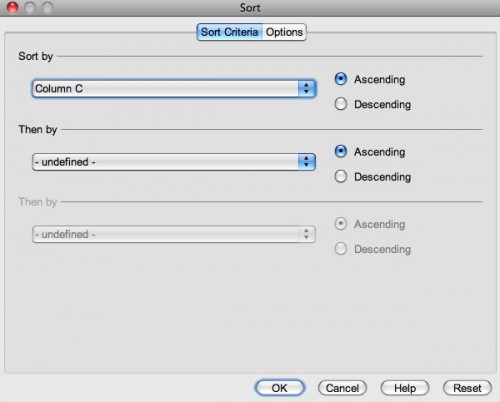
Now with every row EXCEPT the header row selected I chose Data>Sort… from the top menu. Once in here you’ll get the option to sort the entire sheet by one column. In my case I wanted to sort by the “meta_key” column so I chose Column C from the first drop-down and clicked OK.

So now my entire sheet was sorted by the meta_key column, which meant that my thumbnail fields were all lined up in a block.
The values of my meta_key field were all stored over in the next column, column D, the meta_value column. Since every value started with “http://”, I was able to do a simple find and replace operation by selecting the block of thumbnail cells and running the find/replace operation to replace “http://” with “http://exampleurl.com?querystringsrc=http://” and in a flash all the fields were updated.
Now that the table was correct, I had to get it back into the database. I saved the csv, then went back to the phpMyAdmin database.
Here’s where things went wrong. I wasn’t paying attention, and I was trying to upload the new postmeta data into the old table but it kept throwing errors on me. In one stupid moment I selected and DROPPED the entire wp_postmeta table. WHOOPS!
I shouldn’t have done that.
Oh, crap. That wasn’t good. So here’s the thing: As you recall, I actually did do a backup, but it was a FULL backup of everything in my site from my hosting panel, not just the WordPress database, so I would now have to dig through the files to find the WordPress SQL file to replace the table.
It could have been so simple, though. In hindsight, all I had to do was go to the “Operations” tab and COPY the wp_postmeta table as a quick backup just in case something went wrong. That way I could then delete the bad table and rename the good copy back to the original name.
But I didn’t do that.
So I had to do a search in my filedump for the .sql file I was looking for. I found it but was now confronted with a very large database that contained far more than the one table I wanted. Actually it wasn’t that large as databases go, but it was large enough to take a little while for my copy of TextWrangler to chug away and open up.
I wasn’t sure how to separate out the one table I wanted, so I simply started uploading the entire database. phpMyAdmin began renaming the duplicate tables so as not to overwrite anything. Once the duplicate wp_postmeta table was uploaded, I changed the name of it back to the original name and that part was all good.
BUT, in order to get my changes into the postmeta table, this time I deleted everything from my csv file EXCEPT the thumbnail fields and I uploaded that file.
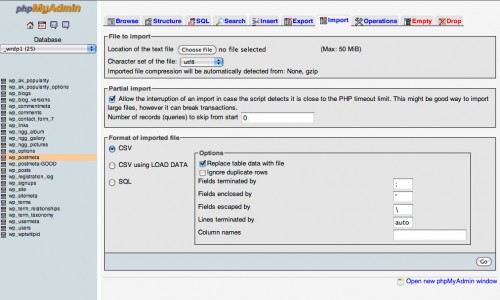
To do this I chose the “Import” tab, then chose CSV for the file format, and made sure to have “Replace table data with file” checked. Then as before, I had to make sure that my field delimiters were set to the correct ones.
Once I clicked “Go”, it replaced the thumbnail rows in the existing table with the tables I was uploading from my csv file. All done.

Whew! That one turned into quite an ordeal. I had actually forgotten why I was doing all this stuff. Then I remembered -Oh yeah, thumbnails in my Related Posts!
So I went back to the front of my site and checked. There they were, correct size and everything! All I had to do at that point was some minor css styling.
I think the lesson here is to be planning this stuff so you don’t have to resort to potentially site-damaging database hackery. It all ended well (this time) but if not for my full backup it could have all went left instead of right.
Anyway feel free to let me know of any questions you might have in the comments or email me. Until then, Happy WordPressing…

Haha, even by the end of reading this article I was like you – “Why are we doing this again? Oh yeah – thumbnails…” :)
This sounds like a day in my life every once in a while, I do the same thing a lot of times – I might take a shortcut at the beginning (i.e. not adding tags to posts) and then later I have to go back through and redo it. But – I don’t think thats such a bad thing really – because you never know if or when you will actually need those things, so I think it actually makes sense to sometimes only do what you have to. At least thats what I tell myself! :)
Yeah my brain was swirling by the time I got through with it all! :)
I know what you mean about taking the shortcuts. When I first started I was thinking “I don’t need these tags, when will I ever use them?” So I skipped what I thought was a not-very-useful feature.
Then it burned me, though. Aargh. I think I’ll be a bit more proactive in the future.
My next trick is to find a WordPress backup solution that works as good as Akeeba Backup on Joomla.
I did what you with with categories. Categories aren’t the best way to organise a WordPress website. A much better way is to make use of Custom Post Types and Post Formats.
Touching on using the Related Posts Plugin – i’ve never used it but I always try to code myself as i’ve had many woes with various WordPress plugins. The problems i’ve come across mainly relate to site performance. I find that plugins can load all sorts of unnecessary rubbish on to a page hence slowing it down massively. Better to be creative yourself (if you have the time of course).
Hey Goose, yeah I’ve discovered that running all kinds of plugins definitely creates a performance hit!
I wish I was an organized type of person, then I could probably do all this without having to resort to third party stuff.