This won’t be a true tutorial but rather an overview of my attempt to create this piece.
I’ve been working on modeling the helmet of the Marvel Comics character Nova for awhile now, but between my laziness and problems I was having (some similar to those within the Blender Planning Issues article I wrote a while back) the thing just never got done.
My first couple of tries were done with Blender 2.49b. I had modeling issues when I decided to extrude the thing before I cut out the eye-holes, effectively doubling the work (at least).
Then as usual, I had trouble finding a decent texture to use for the metal of the helmet for UV Wrapping. Seriously, it just seems like metal is such a chore, but there’s not really a decent tutorial on how to achieve the shiny metal effect I want. There’s zillions of Blenderartist.com forum posts, but they never quite seem to help.
I shelved the project for awhile, but now I’m back, and this time I’m stepping into the Blender 2.53 Beta. I monkeyed around with the Alpha version a few times, but it never “took”. Now there’s no looking back, it’s 2.5 or bust…
So one of my big mistakes last time was modeling the whole shape of the helmet, trying to extrude and cut the eye-holes after the fact, then UV-Wrap the thing with some metal textures. Here’s the fruits of those labors:


Obviously I was not satisfied with this, so I decided to plan better. Before, I kind of eye-balled how big the helmet should be along with where the eye-holes should go.
This time I decided to be more precise. The final destination for this helmet will probably be a full Nova character in Daz Studio. So I actually started there by loading up the Michael character and doing some quick renders of his head in front, side and top views.

Now I could load those as background images and fit the model right to the head it’s going to go on.

With that done, on with the modeling. To get the bucket-like shape of the helmet, I started out by adding a UV Sphere, then cutting it in half horizontally by selecting the entire bottom half in Edit mode and deleting those vertices.
This gave me the top of the helmet. So still in Edit mode I was able to select the bottom edge loop of vertices, then extrude those down past the head to where I thought the helmet should end.
So then I would switch to side and top views to scale the helmet so that it fit comfortably over the head. It’s kind of strange when you think you know how big it should be but the proportions of the head were telling me otherwise, so I ignored what I thought looked correct and just followed my reference.
Once that was done and I had the basic shape correct, I selected the left half of the mesh in Edit mode, then I deleted that side. After this I attached a Mirror Modifier to the mesh, which of course, mirrored my existing mesh so it appeared that I had a complete shape.

Now when I made my modeling edits on the right side, they would automatically be applied to the mirrored side and that would save me a bunch of work.
I was able to make some loop cuts around the eye area and deleted the part necessary to create the eye-holes. You can expect to do some wrangling here with the vertices. I don’t want to make it sound like I just did it in 15 seconds or something. I probably spent a half-hour getting it the way I wanted. The upside is that my mirror modifier made the same changes to the left side for me. Nice.
So with the eye-hole cut, I moved to the bottom of the helmet to pull out the front bottom edges. They seem to flare outwards a bit. In the comics the artists always take their own creative license with this so just pulled out the bottom to where I thought it should go. I used proportional editing to adjust much of this. Again, my changes on the right were reflected on the left.
With this done, it was time to apply the mirror modifier to the mesh. Doing this makes the mirrored half of the mesh “real”, so you’ll get real vertices you can adjust.

My next step was to then extrude inward to create the thickness of the helmet. I decided to go into bottom view and extrude from there. Pressing the A key to select all (still in Edit mode, of course), then pressing the E key for extrusion, you can just drag your mouse inward to extrude. I did that to where I felt comfortable.
It did kind of extrude downward, too. I suppose I could have constrained the extrusion to a particular axis by pressing E, then the key for the axis I wanted (X,Y,Z), but I decided to just translate the vertices (they were still selected from the extrusion operation) up a little until it looked good to me.
So I actually had my finished helmet model right now. No crazy normals problems or anything like I had with my other helmet.
I should add that I set the mesh to “Smooth” under the Shading heading in the object menu on the left. I also added a subsurf modifer to smooth things out even more.
Doing this also smoothed out the sharp edges I needed on the helmet though. So to restore some of my hard edges, I had to make even more loop cuts, then drag the cuts out to the edges to force those edges back to being sharp again.
I didn’t really see any normals problems but I had gotten in the habit of always recalculating normals outside after a lot of extrusion or loop cutting.
After this, now it was time for the really hard part. Adding a metallic material.
I’d had enough of the UV Wrapping from before. This time I decided to go with a procedural texture using Blender’s internal materials setting and not relying on an image.
As I mentioned, I haven’t got this down to a science yet. I ended up poring over all kinds of .blend files I found on the net and into all kinds of forums looking for tips. Still no definitive tutorials. Maybe they just don’t work in 2.5.
Anyway I decided to just crank up the hardness and specularity on the helmet, then remove the softness from the shadows on the lights. I got a fairly decent approximation, but still not quite what I wanted.
I messed around with this for a couple of days but I’m not really getting any farther.
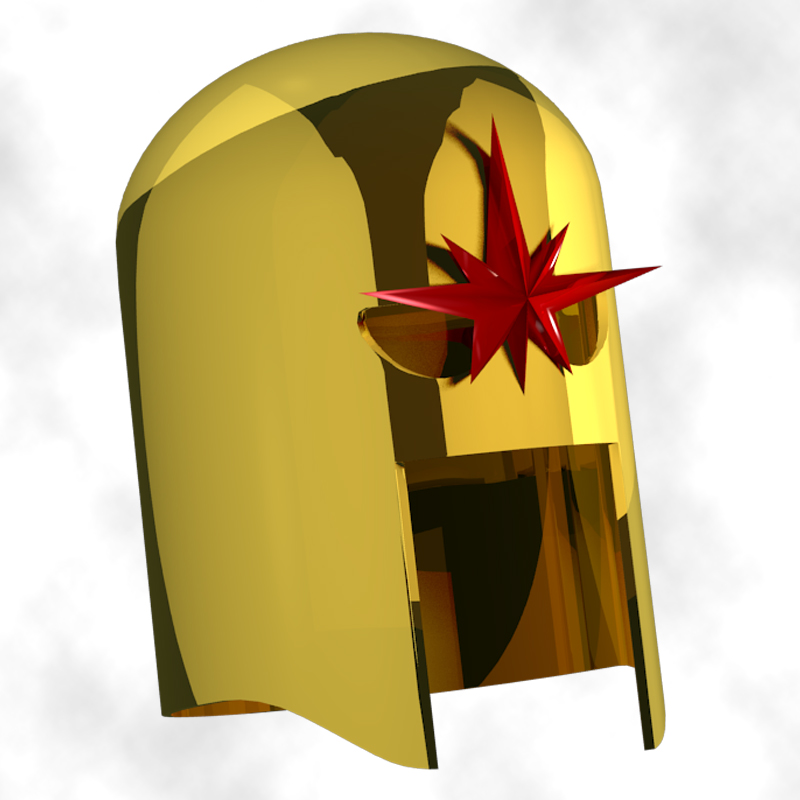
The red ornamental thing on his helmet was fairly quickly done. I made the outline of the path in Illustrator, using techniques I outlined in a previous article I wrote on getting Illustrator paths into Blender.
After I imported that path in, I extruded all the necessary points inward to the center, selected them all and did a “remove doubles” operation on them, which made them all connect to the same vertices.
Then I was able to translate the center vertices upwards and give that piece some depth. The materials on this one were also procedural and for once gave me little trouble. All I had to do at this point was to parent the red piece to the helmet so they would always stick together.
So that’s where I’m at for now. It still doesn’t look exactly the way I want it to look (still having some shadow issues, and such), but it’s good enough to use in Daz Studio. I still have some more pieces of the costume to make, but I think I should have a working Nova character soon.


I know I wasn’t very specific with this one but let me know if you have any questions, or especially if you know of any good metal materials setting or tutorials.
That is pretty impressive. How much time do you have into it so far?
Thanks Dave. Including the first round of awful helmets about 12 hours total.
I still haven’t got back to this one. 2011 is going to be seeing a lot more 3D from me!
So are you a 3D artist yourself?
You know you can set edge hardness, so that edges don’t smooth out in subdivision?
You know I think I saw that on one of the Blender Guru tutorials, but I sure forgot about it until now. Thanks for reminding me!